
A small mounting device called a V2-QDMT is included with the purchase of every V2-SnipePod. The V2-QDMT is attached to the rifle or firearm via a "INDUSTRY STANDARD QUICK DETACH" mount or QD stud for short. The V2-QDMT is manufactured out of 6061T6 Aluminum on a CNC milling machine. The V2-QDMT weights an incredibly light 109.2 grains or .25 of an ounce! There is an elliptical shaped hole in the V2-QDMT that allows it to fit over the head of any QD mount, and lock firmly to the QD stud with a dowel pin/set screw combination.
 |
| V2-QDMT INSTALLATION |
The tightening of the locking setscrew places the dowel pin inside the V2-QDMT, under "traction", or a "sheering stress". This force prevents the dowel pin from coming out. Absolutely no pressure is applied to the firearms stock. This design allows the V2-QDMT to be attached to firearms that other bipods typically can not be attached to. Examples include:
The V2-PIC mount is an optional accessory designed to directly attach to the military spec Picatinny rails that are popular on AR-15 platform and other modern progressive sporting firearms. The V2-PIC does not provide a surrogate hole for attaching a sling swivel as the V2-QDMT does. This is because the Picatinny rail environment provides a broad and rich selection of sling options that may or may-not be compatible with the sling swivels commonly used with QD Studs.
 | 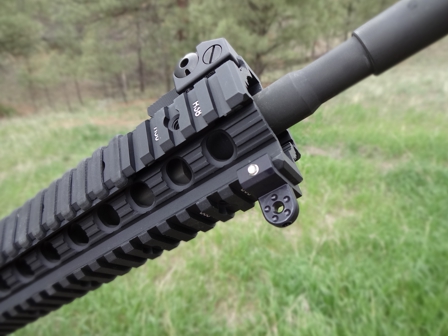 | 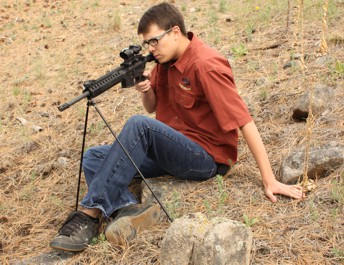 |
| V2-PIC INSTALLATION | Actual V2-PIC on AR15 | Forrest Kramer with his S&W AR15 |
 |
| Unfolding the legs |
 |
| Snapping ON/OFF |
The pin is designed to be easily depressed with a thumb. The SnipePod V2 ability to be installed from both the left or right handed shooters perspective greatly enhances the installation process. The pin positively snaps when pressed in or pulled out, thereby eliminating accidental changes is position. This provides confidence, even when dealing with heavy brush conditions.
 |
| Stalking Position through Forward Storage Position *note-this illustration shows obsolete QDMT |
Many hunting situation require quick changes of position, lengthy spot-and-stalks, or even crawling on ones hands and knees. Simply pressing the "rotation release button" allows the SnipePod V2 legs to rotate back, parallel to the rifle. In this position, the rifle and SnipePod can easily be managed as one. Place the legs of the SnipePod V2 inside your grip on the rifle, and make your move. The sitting SnipePod V2(s) in particular are very easily managed in this manner, because the feet the SnipePod V2 will extend approximately back to the recoil pad area of the rifle.
The SnipePod V2 also has the ability to be rotated forward to allow the legs to be stored adjacent to the barrel of the rifle. This is one of several options for storage of the SnipePod V2. Each SnipePod V2 comes with a lanyard to bundle the legs under the barrel. A quick release of the slip buckle and sliding the lanyard back to a position in front of the scope provides for lightning fast deployment of the SnipePod V2.
The SnipePod V2 gives the shooter several options for transporting.
Only the SnipePod V2 give you this many options for transporting.
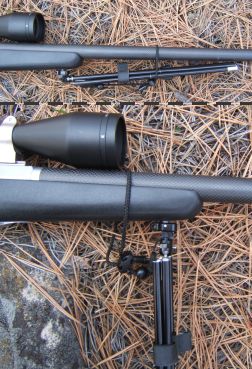 |
| 30" SnipePod V2 stored on front of rifle |
*note* The standing model SnipePod V2s, because of their length are managed differently in a spot-and-stalk situation. Typically these are carried separately and quickly attached to the V2-QDMT/V2-PIC at the last moment prior to shooting.
Height adjustment is accomplished in two ways.
The most fundamental height adjustment is by simply varying the spread of the legs. The closer the feet, the higher the rifle. The further apart the feet, the lower the rifle. By using this technique, there should be more than enough range of height adjustment for shooting a sitting SnipePod V2 from the sitting position, the standing SnipePod V2 from the standing position, or the prone SnipePod V2 from the prone position. Follow this link on MODEL SELECTION to see details on the range of heights provided by this technique.
 |
| SnipePod V2 - 27" to 12 inch prone |
If there is a need to convert a sitting SnipePod V2 to the prone position, or a standing SnipePod V2 to the sitting/prone position, segments must be removed from the leg length. For example... The V2-30 sitting SnipePod V2 has 5 segments in each leg. For this example, the segment attached to the ball is segment 1, and the segment attached to the foot is segment 5, with the other segments numbered accordingly. First allow all segments to join forming the full length 30 inch SnipePod. Now separate segment 2 and 3 and fold 3,4 and 5 back along side of segments 1-2. Next separate segment 4 from 5, and fold 5 back along side of 1-2 and 3-4. Finally wrap the bundle of segments together with the Velcro wrap, and the SnipePod is now set up for prone shooting at about 13 inches.
 |
| Accuracy vs Visibility |
On the other left side of the chart is the prone position. It clearly offers the greatest accuracy potential, but with the least visibility. In most hunting situation, there is always some type of obstacle (grass, rocks, brush, cactus, etc..) that is taller than the bore of the firearm. And "MURPHY'S LAW" dictates that that obstacle will be in direct line between shooter and target.
In between prone and standing are the shooting position of sitting and kneeling. These position offer the best compromise. Sitting/kneeling positions are relatively quick to get into, are comfortable, and can be done in difficult terrain. As most experienced mountain hunters can attest to, lying prone on a steep side hill, attempting to shoot downhill or across canyon is like tobogganing. However sitting/kneeling in the same situation is easy and comfortable.
When shooting from the sitting position, simply leaning back against something, like a rock, tree or into the side hill will increase the accuracy of the shooter to the level of the prone position. This technique also allows the shooter to better leverage the amazing panning capabilities of the SnipePod V2.
Most shooters will find that they have at least double the range with equal accuracy when comparing sitting to the standing position. In other words, if they can effectively place killing shots into a deer size target with the standing SnipePod V2 at 200 yards, then they can place the same shots with a sitting SnipePod V2 at 400-500 yards. This 200-300 yard advantage that the sitting position has over standing is considerable. Rather than risk alarming game by trying to get within that 200 yard standing SnipePod V2 range, you have the option to actually backup to look for a vantage point with clear visibility and take the shot sitting.
For general purpose hunting it is hard to beat the versatility of the sitting model SnipePod V2s. They can be used prone, and provide considerable more shooting range than standing. Over 90% of all SnipePod V2s sold are sitting models, testifying to the popularity and versatility of this position.
There are some special applications where the standing SnipePod V2 is the only choice. Hunting plains game in Africa is one such application. The terrain is flat, the brush and grass is tall. Also hunting caribou or moose in Alaska where conditions are wet, and river bottoms are covered in thick tangled brush may dictate the use of a standing SnipePod V2.
A prone SnipePod V2 may fit the bill if you are a New England rock/wood chuck hunter. The shots are long, and if you wait until the hay fields have been moved to a consistent 4-6 inches, there will not be any ground obstacles to shoot through.
 |
| Dimension Chart |
Take your firearm and get into your normal shooting position. Be sure the barrel is held parallel to the floor. Have an assistant measure from the sling stud hole to the floor. Choose a Snipe Pod where the Dim-A is less than, and the Dim-B is greater than the measured distance.
Or simply follow our "rules of thumb" column in the table below to determine what size fits based on a persons height.
Note that in the sitting models, there is overlap between the Din-B and the Dim-A of the next larger Snipe Pod. If your measurement falls in this overlap range, choose the larger size.
Example: Your measurement is 26.5". The V2-27's B dimension reaches to 27.8" and the V2-30's A dimension starts at 25.7". In this situation choose the taller Snipe Pod.
| Model | Description | Rule of Thumb Fit | Dim-A | Dim-B | Dim-C | Dim-D | Height Range of Adjustment (Dim B minus Dim A) | Weight |
|---|---|---|---|---|---|---|---|---|
| V2-10 | SnipePod V2 10" legs low prone | low prone | 9 3/16" | 10 7/8" | 12 1/4" | 4 1/4" | 1 11/16" | 2 Ounces |
| V2-13 | SnipePod V2 13", legs tall prone | tall prone | 11 5/8" | 13 13/16" | 15 11/16" | 5 1/4" | 2 1/8" | 2 Ounces |
| V2-24 | SnipePod V2 24", sitting model | Heights 5' - 5'5" | 20 11/16" | 24 5/8" | 28 5/16" | 9 1/16" | 4" | 5 Ounces |
| V2-27 | SnipePod V2 27", sitting model | Heights 5'5" - 5'11" | 23 1/8" | 27 9/16" | 31 3/4" | 10 1/8" | 4.1/2" | 5 Ounces |
| V2-30 | SnipePod V2 30", sitting model | Heights 5'11"" - 6'4" | 25 9/16" | 30 9/16" | 35 3/16" | 11 3/16" | 5" | 5 Ounces |
| V2-33 | SnipePod V2 33", sitting model | Heights 6'4" - 6'9" | 28 1/16" | 33 1/2" | 38 5/8" | 12 3/16" | 5 7/16" | 5 Ounces |
| V2-57 | SnipePod V2 57", standing model | Heights 5'5" - 5'11" | 47 11/17" | 57 1/8" | 66 1/8" | 20 9/16" | 8 7/8" | 11 Ounces |
| V2-64 | SnipePod V2 64", standing model | Heights 5'11"" - 6'4" | 53 7/16" | 64" | 74 3/16" | 23" | 10 5/8" | 11 Ounces |
| V2-72 | SnipePod V2 72", standing model | Heights 6'4" - 6'9" | 60" | 71 7/8" | 83 3/8" | 25 3/4" | 11 15/16" | 11 Ounces |